Difference between revisions of "Account Management/Customer Screen/Purchase"
(Created page with '=Purchase Management= Purchases made by customers, both outright purchases and installment plans, are stored with the customer’s details. You can view past purchase details, a…') |
m (Scarpenter moved page PurchaseManagement to Account Management/Customer Screen/Purchase) |
(No difference)
| |
Revision as of 12:58, 22 June 2016
Contents
Purchase Management
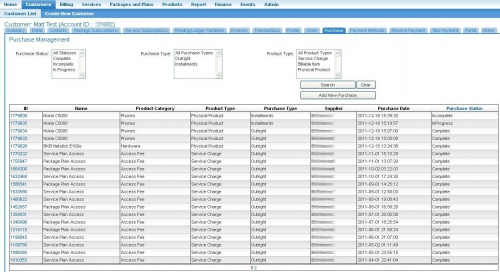
Purchases made by customers, both outright purchases and installment plans, are stored with the customer’s details. You can view past purchase details, as well as view the invoices the purchases appeared on.
To View a Customer’s Purchase History
- Select Customers > Customer List > from the Menu. The Customer List page will display showing a list of existing customers.
- Locate the customer required in the list and click either the Account Number or Customer Name link in the list. The Customer page will display showing the account information summary.
- On the Customer page, select the Purchase tab. The Purchase Management page will display listing all the customer’s purchases.
Search
You can locate a purchase by using the Search function. The following fields can be used to locate a purchase:
- Purchase Status - All, Complete, Incomplete and In Progress
- Purchase Type - All, Outright, or Installment plans
- Product Type - All, Service Charges, Billable items, or Physical Products
To View an Outright Purchase
- Locate the required purchase that has a Purchase Type of ‘Outright’ on the Purchase Management page.
- Click the purchase number link in the ID column of the list. The Product Purchase Information page will display.
- To view the invoice that the purchase appeared on, click the invoice number in the Invoice column of the Transactions list. The invoice details will appear.
- Click the View Invoice button to view the invoice .pdf.
To View an Installment Plan
- Locate the required installment plan that has a Purchase Type of ‘Installments’ on the Purchase Management page.
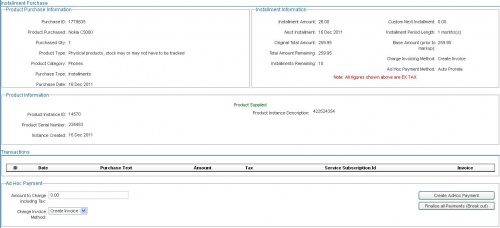
- Click the installment plan number link in the ID column of the list. The Installment Purchase page will display.
- The Product Purchase Information section shows the basic product purchase information.
- The Installment Information section shows the installment payment particulars, including the payment amount, next installment date, total outstanding etc.
- The Product Information shows the product instance details.
- The Transactions section shows all payments created to date for the installment plan, as well as whether each payment has been included on a customer invoice, or is still pending.
Depending on the installment plan’s status, you may perform various actions:
- Incomplete - update the product supplied information
- In Progress - create an ad hoc payment against the installment plan, or finalise the installment plan (i.e. break out and complete the plan)
- Complete view the invoice(s) that the installment payments appeared on, if processed.
To Update the Product Supplied Information
If an installment plan was created but the product was not supplied to the customer at the time the purchase was saved, you can update the installment plan once the product has been supplied. The system will not create installment plan payment cardlines for invoicing until the product has been updated as provided to the customer.
- Select Customers > Customer List > from the Menu. The Customer List page will display showing a list of existing customers.
- Locate the customer that has the required installment plan in the list and click either the Account Number or Customer Name link in the list. The Customer page will display showing the account information summary.
- On the Customer page, select the Purchase tab. The Purchase Management page will display.
- Locate the required installment plan with a Purchase Status of ‘Incomplete’ on the Purchase Management page and click the installment plan number link in the ID column. The Installment Purchase page will display.
- In the Product Information section, enter the serial number, or other unique information (e.g. IMIE etc) in the Product Serial Number field.
- Enter the description in the Product Instance Description field.
- Enter the date the product was supplied in the Instance Created field. A calendar tool will appear to allow you to select the required date.
- Click the Save Product Information button. A message will display at the top of the screen showing, “Product Instance created, installments will now proceed”.
To Create an Ad Hoc Payment on an Installment Plan
Once an installment plan is In Progress (i.e. the product has been supplied to the customer), the system will automatically create cardline entries for the instalment payments that will appear on the customers’ invoices. Customers may wish to make an Ad Hoc, or unscheduled, payment against the installment plan between invoices e.g. to reduce the amount owing etc.
- Select Customers > Customer List > from the Menu. The Customer List page will display showing a list of existing customers.
- Locate the customer that has the required installment plan in the list and click either the Account Number or Customer Name link in the list. The Customer page will display showing the account information summary.
- On the Customer page, select the Purchase tab. The Purchase Management page will display.
- Locate the required installment plan with a Purchase Status of ‘In Progress’ on the Purchase Management page and click the installment plan number link in the ID column. The Installment Purchase page will display.
- In the Ad Hoc Payment section, enter the payment amount in the Amount to Charge including Tax field.
- Select the invoicing method required for the payment from the Charge Invoice Method drop list. Options include:
- Create Invoice - a pending invoice will be created for the payment once the payment is confirmed
- Next Invoice - a pending cardline will be created for the payment to be included on the customer’s invoice at the next bill run
- Click the Create AdHoc Payment button. A message will display at the top of the screen showing, “Once off payment has been accepted…” The payment will appear in the Transactions list.
To Finalise an Installment Plan
An installment plan may be finalised, or broken out at any time i.e. if a customer wishes to pay out the amount outstanding before the scheduled completion date. This effectively stops the payment plan processing in the system and creates a corresponding invoice for the balance remaining.
- Select Customers > Customer List > from the Menu. The Customer List page will display showing a list of existing customers.
- Locate the customer that has the required installment plan in the list and click either the Account Number or Customer Name link in the list. The Customer page will display showing the account information summary.
- On the Customer page, select the Purchase tab. The Purchase Management page will display.
- Locate the required installment plan with a Purchase Status of ‘In Progress’ on the Purchase Management page and click the installment plan number link in the ID column. The Installment Purchase page will display.
- Click the Finalised all Payments (Break out) button. A message will display showing the breakout details, and prompt you to confirm the installment breakout.
- Click the Yes button to confirm. A message will display at the top of the screen showing, “Finalising…” The system will process the installment plan finalisation and create a pending cardline will be created for the final payment amount to be included on the customer’s invoice at the next bill run. The installment plan status will be updated to ‘Complete’.
- Click the No button to cancel. The system will not process the installment plan breakout and will display the Installment Purchase page as before.


