ServicePlans/RateCard/Creating Rate Cards
Contents
Overview
This article covers the steps to create a Rate Card in Emersion and adding a rate to a tariff inside the rate card. In this scenario, we will create a simple SELL rate card. SELL rate cards hold the pricing information that you sell your products and services at. Although we have not covered how to create a BUY rate card, the steps are identical with only a few varying settings.
You may or may not need to create a corresponding BUY rate card.
- You will need to create a BUY rate card if any of your service suppliers are not an Emersion client.
- You will not need to create a BUY rate card for any services purchased via a service provider who is an Emersion client.
This article does not cover Product Rate Cards or Account Discount Subscription Rate Cards.
Create a Rate Card
Nav: Packages and Plans > Management > Rate Cards
This page shows a list of rate cards you have used or are currently using.
1. Click the Create New button 2. In the Name field, give your rate card a name. This name will be used only inside Cumulus. 3. In the External name field, give your rate card an external name. External names may show outside of Cumulus, and should be treated as customer-visible. 4. Enter an optional reference name and reference key if appropriate. 5. Enter an optional description. 6. Choose whether your new rate card is a BUY or a SELL rate card. In this demonstration, we are using a SELL rate card and will link it to a SELL Service Plan. 7. Select the Service Type Category that this rate card belongs.
This must be the same Service Type category belonging to any SELL plans that this Rate Card will be linked to. In other words, all SELL Service plans using this rate card will adopt the rates stored inside this rate card. Furthermore, Usage received will be rated against the rates inside the rate card.
We recommend you leave all Rate Cards in draft status until you are happy with the rate card, it has been peer-reviewed internally by someone else - hey we all make mistakes sometimes - and you are ready to sell your plans. Once a Rate Card has been approved, it becomes saleable. Once an order has been placed for a service that uses this rate card, it cannot be changed.
8. When you are ready to proceed, click the Save button to save the Rate Card.
You will then be taken to the management screen of the rate card. At the top if this screen are the overview details you entered above. Below are two subtabs where you can:
- [[ |Add a rate to a tariff]]
- Link the Rate Card to a Service Plan
Once you have entered the prices against the relevant tariffs, and have linked the Rate Card to one or more Service Plans, your rate card is ready to use. Only once you are happy with all the below settings should you change the Status of the Rate Card to Approved.
PLEASE NOTE: Service Subscription Rate Overrides take precedence over everything else. It will attempt to rate in the following order:
- Service Subscription Rate Overrides
- Account Discount Subscription Rate Cards
- Service Plan Rate Cards
- Included Value fall back rate cards
Adding a Rate to a Rate Card
To add a rate override, start by selecting the tariff you want to add a rate for. There are two ways to search.
Step Through the Tariff Hierarchy
From the Select Tariff drop down list, choose a tariff or tariff group from the list. Users will see an << Add Tariff button appear to the right once a selection has been made. If there are more groups and tariffs under the selection, another drop down list will appear containing the tariff groups/tariffs under the group that was selected.
Users can keep stepping down through the tariff groups / tariff hierarchy until they find the tariff group or tariff they are searching for.
At each step in the search, users will see the << Add Tariff button appear to the right once a selection is made.
When the last step in the hierarchy is reached, no more drop down lists will appear to the right of the button.
Click the << Add Tariff button when you have found the rate that will be overridden.
Vertical View
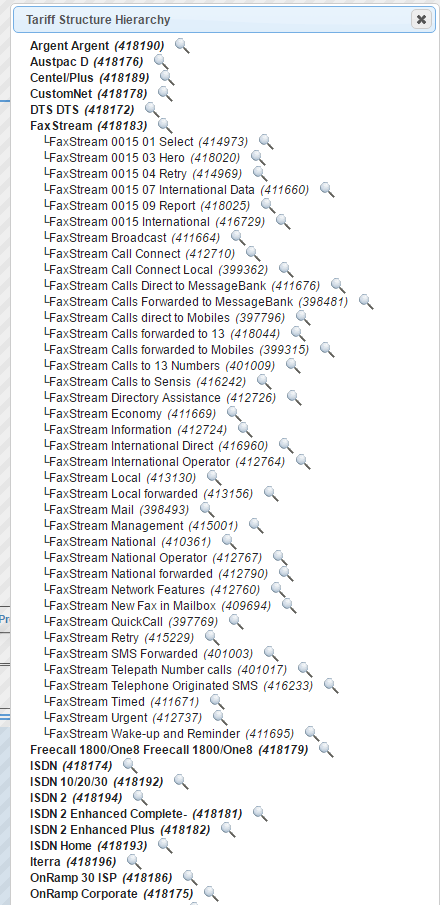
Users can also inspect the tariff tree vertically and 'drill down' into a tariff group. By drilling down, users can see tariff groups and tariffs in a structure very similar to navigating through files and folders on a personal computer. The Emersion tariff id is printed on-screen inside the brackets, to the right of the tariff name.
To do this:
click the Tariff Structure Hierarchy button. A pop-up window will open with all top-level tariff groups displayed. When you have found the tariff id you need, copy it, close the tariff structure pop up and enter the tariff ID into the search field.
Rate Fields
- Once you know the tariff and have searched and selected a rate, the Add Rate pop-up box will be displayed
- Select the Rate Profile for the rate from the drop down list on the left. This will determine what fields you need to complete next.
Emersion's supports the following rate profiles:
| Passthrough | The supplier charge from the usage file is passed through to the customer |
| Markup % | Increases the supplier charge from the usage file by the defined percentage |
| Discount % | Decreases the supplier charge from the usage file by the defined percentage |
| Flat Charge | Applies a flat charge to the usage |
| Rate Per | Applies a price per time interval, with a flagfall, minimum charge, charge interval, price per charge interval, and price interval |
| Excess | Applies a price per time interval once the initial free time has been reached, with a flagfall, minimum charge, initial free time, charge interval, price per charge interval, and price interval |
| Simple Cap | Allows a maximum value to be applied to the usage, with minimum cost, maximum cost, maximum type (i.e. $ or time), charge interval, price per charge interval, and price interval to be defined |
| Capped | Applies a price per time interval once the initial free time has been reached up to a maximum value, with a flagfall, minimum charge, maximum cost, maximum type (i.e. $ or time), initial free time, charge interval, price per charge interval, and price interval |
| FF + Markup % | Applies a flagfall and increases the supplier charge by the defined percentage |
Tiered Rating
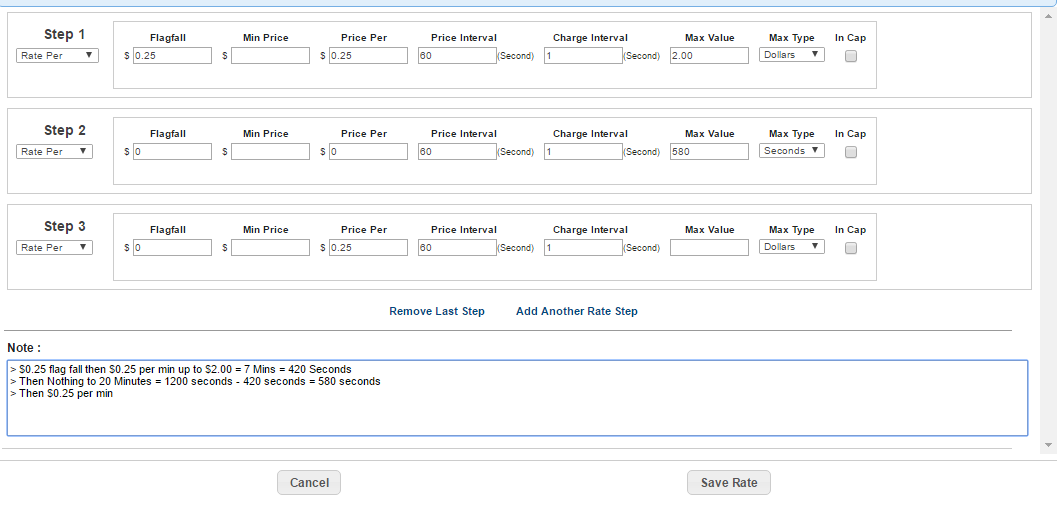
Tiered rating is achieved by using 2 or more "Steps". Each step will contain a set of rate configurations, of which would be determined by the rate profile selected - as per above table
- Only 'Rate Per', 'Excess', 'Simple Cap' & 'Capped' allow multiple tiers to be configured to charge at different rates at various usage limits on a single usage type.
For example, a rate per rating method for a telephony service, set with multiple tiers that may apply $0.25c Flagfall, $0.25c per minute (60 seconds) for a call up to a value of $2 (giving 7 mins (420 seconds) call time for $2), and then additional time charged at $0 up to 20 mins (1200 seconds), followed by simply charging $0.25c per minute (60 seconds) for the remaining call usage

- Fill in all fields as required by the rate profile you have selected.
Special note regarding Max Value
- When you are finished, press Save Rate. The Rate Card screen will refresh with the Rate sub tab in focus. The table containing the new rate and a notification message will be displayed to the user.


