Admin/My Invoice Template
From Emersion
Revision as of 11:35, 26 July 2016 by Scarpenter (talk)
Template:+DISPLAYTITLE=My Invoice Template
Contents
Overview
The My Invoice Template section of the Admin section gives service providers the ability to customise particular sections of the invoice template.
The invoice template styling is controlled in two ways:
- Invoice Designs
- Invoice Layouts
Invoice designs are collections of settings and styling that can be shared across multiple invoice layouts.
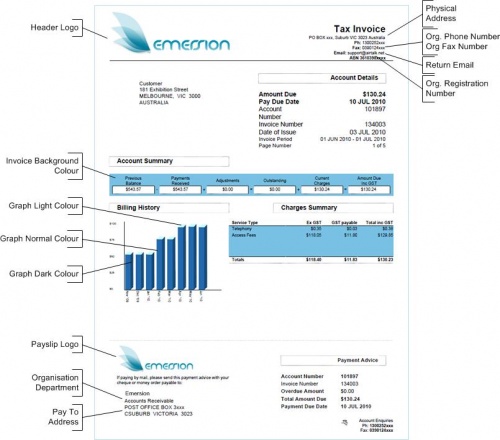
Invoice layouts give service providers the ability to control:
- company branding
- colour scheme
- physical, postal and payment addresses
- organisation details, such as ABN
- contact numbers and email addresses
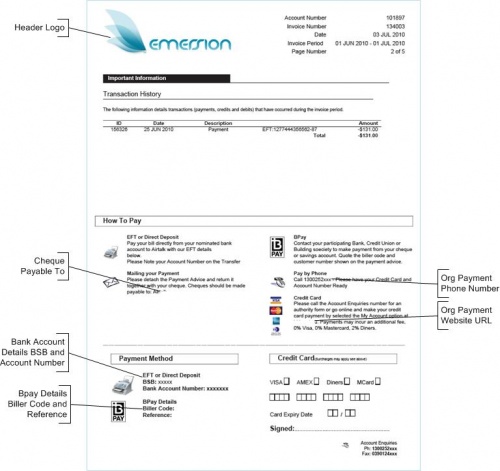
- bank and/or BPAY account details.
To Display Invoice Templates
- Select Admin > My Invoice Template from the Menu. The Invoice Layouts page will appear showing a list of existing invoice templates.
- Locate the desired invoice template, and select the template via the link through the Name column. The Invoice Layout Summary page will be displayed. This page has six tabs associated with it. Each of the tabs relates to fields of the overarching template which are customisable with your company information.
- Click the required tab to display the details.
- To return to the Invoice Templates list, click the My Invoice Template from the menu bar.
To Set Your Default Invoice Template
The default invoice template is assigned to all customers initially when the customer account is created. You can then select another invoice template for each customer as required (see below).
- Select Admin > My Invoice Template from the Menu. The Invoice Layouts page will appear showing a list of existing invoice templates.
- Click the radio button beside the required invoice template in the Default column of the invoice template list. An information box will appear advising that the default invoice template has been successfully saved.
To Create an Invoice Template
- Select Admin > My Invoice Template from the Menu. The Invoice Layouts page will appear.
- Click the Create New button. The New Invoice Layout page will appear.
Layout Name
- Enter the template name in the Layout Name field.
- Enter a description for the invoice template in the Layout Description field.
- Click the Save Layout button.
- The Invoice Layouts page will reappear showing the new layout name created with an information box showing the invoice layout has been saved.
- Click the new invoice template name in the Name column. The Invoice Layout page will be displayed, showing the Summary page.
Logos & Colours
- Click the Logos & Colour tab. The Logos and Colour information page will be displayed.
- Click the Edit button. The page will update to show the fields enabled for editing.
- Select the Header Logo file (e.g. .jpg, .png etc). Click the Browse button beside the field. The File Upload window will appear. Navigate to and select the required logo graphic file, and then click Open. The file name will appear in the field.
- Enter the Header Logo Width (in millimetres). The maximum width is 80 mm.
- Enter the Header Logo Height (in millimetres). The maximum height is 30 mm.
- Select the Payslip Logo file that appears near the bottom of the invoice along with the remittance advice. Click the Browse button beside the field. The File Upload window will appear. Navigate to and select the required logo graphic file, and then click Open. The file name will appear in the field.
- Enter the Payslip Logo Width (in millimetres). The maximum width is 60 mm.
- Enter the Payslip Logo Height (in millimetres). The maximum height is 15 mm.
- Enter the Graph Light Colour (see diagram above).
Note: The colours for the usage graph bars and invoice background must be entered using the standard colour name or hex colour code (refer to http://www.w3.org/TR/css3-color/#svg-color). - Enter the Graph Normal Colour.
- Enter the Graph Dark Colour.
- Enter the Invoice BG Colour for the invoice background.
- Click the Save Logos and Colours Info button. The Invoice Layout Summary page will appear with an information box showing the invoice colours and logo have been saved.
Addresses
- Click the Addresses tab. The address information page will be displayed, which will be empty initially as no addresses have been set up.
- Click the Edit Address button below Physical Address. The page will update to show the address fields enabled for editing.
- Select an address type from the Choose Address Type drop list. By default, the “Standard Address (inc LOT)” is displayed. The page will update to show the fields relevant to the address type you choose. Available address types include:
- Standard Address (inc LOT) a regular street address with street number range, lot number, street name, type and street suffix, suburb, postcode, state and country.
- Unit / Complex / Campus a complex street address with building name, site details, unit type and number, level type and number street number range, lot number, street name, type and street suffix, suburb, postcode, state and country.
- Postal Address (PO Box) a postal address with postal delivery type, box number, suburb, postcode, state and country.
- Unstructured Address a simpler address with address line 1, address line 2, suburb, postcode, state and country.
- Enter your address details in the appropriate address fields displayed according to the address type you have selected.
- Click the Save Address button to save the physical address information.
- Click the Edit Address button below Return Address. The page will update to show additional address fields enabled for editing.
- Repeat steps 23 to 25 to enter your return address details.
- Click the Edit Address button below Payto Address. The page will update to show additional address fields enabled for editing.
- Repeat steps 23 to 25 to enter your pay to or remittance address details.
Organisational Details
- Click the Organisational Details tab. The Organisational Details page will be displayed, which will be empty initially as no details have been set up.
- Click the Edit button. The page will update to show the fields enabled for editing.
- Enter your company’s account name for cheque payments in the Cheque Payable To Name field.
- Select the department responsible for accounts receivable from the Organisation Department drop list. This should contain all of the organisational units set up in the Org Units & Roles function.
- Select the department responsible for correspondence from the Return Address Department drop list.
- Select your company number (i.e. ABN / ACN) from the Org Registration Number drop list. This will contain all registration numbers entered by the Emersion support team when you were set up to use Emersion.
- Enter your company’s main contact phone number in the Org Phone Number field.
- Enter your company’s accounts receivable phone number in the Org Payment Phone Number field.
- Enter your company’s return phone number in the Return Phone Number field.
- Enter your company’s fax number in the Org Fax Number field.
- Enter your company’s main email address in the Return Email field.
- Enter your company’s return fax number in the Return Fax Number field.
- Enter your company’s payment web site (if used) in the Org Payment Website URL field.
- Click the Save Organisational Details button to save the organisational information.
Bank and BPay Account Details
- Click the Bank & Bpay Account Details tab. The Bank Account Details page will be displayed, which will be empty initially as no details have been set up.
- Click the Edit button below the Bank Account Details. The page will update to show the fields enabled for editing.
- Select your bank from the Bank drop list. If your bank does not appear in the list, please contact Emersion support.
- Enter your bank account’s BSB number in the BSB field.
- Enter your account number in the Account Number field.
- Enter your bank’s branch name in the Branch field.
- Enter your bank account name number in the Account Name field.
- Enter a reference number that your customers should enter when paying their account through electronic funds or direct bank transfer in the Reference field.
- Click the Save Bank Account Details button to save your bank information.
- Click the Edit button below the Bpay Account Details. The page will update to show the fields enabled for editing.
- Enter your Bpay biller code in the Biller Code field.
- Enter a reference number that your customers should enter when paying their account using Bpay in the Reference field.
- Click the Save BPay Account Details button to save your BPAY information.
- To return to the Invoice Templates list, click the My Invoice Template menu.
Custom Message
- Click the Custom Message tab. The Custom Message page will be displayed, which will be empty initially as no details have been set up.
- Click Edit button. The page will update to show the fields enabled for editing.
- Select the type of the custom message in Invoice Footer radio list. If you prefer to provide some note to your customer, please choose Note Footer. You should choose Image Footer in case you want to use an image (e.g. promotion banner).
- Enter messages in the Note Footer fields if your Invoice Footer is of Note Footer type. Go to item 8.
- If your Invoice Footer is set to Image Footer, click Choose File button beside the Browse Image field. The File Upload window will appear. Navigate to and select the required graphic file (.jpg, .png or .gif file type) and click Open. The file name will appear in the field.
- Enter the Image Footer Width (in millimetres). The maximum width is 185 mm.
- Enter the Image Footer Hight (in millimetres).
- Enter more details in Other Information text area.
- Click the Submit button to save the changes.
To Edit an Invoice Template
- Select Admin > My Invoice Template from the Menu. The Invoice Layouts list page will appear.
- Locate the required invoice template, and click the template in the Name column. The Invoice Layout Summary page will be displayed.
- Click the required tab (i.e. Layout Name, Logos & Colours, Addresses, Organisation Details, and Bank & Bpay Account Details).
- Enter or modify the invoice template information in the appropriate fields, as required (see above).
- Click the Save buttons where appropriate
- Click the My Invoice Template menu to return to the Invoice Templates list.
To See the Changes in an Invoice
- Navigate to Finance > Accounts Receivable > Invoice List tab.
- Choose any Pending invoice and click Manage link in Action table column.
- Click Re-Render button on the right on the Manage Invoice page.
- Download the re-rendered invoice by clicking the Download link in PDF table column.
- Open the file to see the changes applied.

