Difference between revisions of "Service Desk/Outbound Email"
m (updated page) |
(we do not map sms action types to this service type - removing reference to sms) |
||
| Line 24: | Line 24: | ||
To begin creating and customising your template go to the following location(s): | To begin creating and customising your template go to the following location(s): | ||
| − | * NAV: '''Events > Templates > Email | + | * NAV: '''Events > Templates > Email''' |
| − | |||
It is recommended to choose the ''Default Account Recipient''. | It is recommended to choose the ''Default Account Recipient''. | ||
Revision as of 15:46, 9 February 2018
Contents
Overview
Service Desk Outbound Email is an optional extension to the Service Desk Module. It provides the ability for service providers to notify end users by email of a new note being entered against a ticket
This extension handles outbound email only. A different extension handles inbound email notifications for the Service Desk. If you would like more information on the Service Desk Outbound Email extension, please contact Emersion Sales.
Once the module is enabled for your service provider account, you will need to perform some configuration to get it up and running.
Special Note
Emersion do not currently support "updating", or adding a comment to, an existing service desk ticket by way of email reply to an outbound message.
An end user can respond by logging into the end user portal, navigate to Service Desk > Click Service Desk Ticket ID > Add Note > Send
Configuration
This section describes how to configure Cumulus to allow the system to send automatic email updates to end users upon creating a new note against a service desk request.
Prerequisites
Upon subscription to the module, Emersion will map the Notify Service Ticket Updated system event type to your service provider account for each account profile you have.
You can then create event templates for each account profile.
Create the Event Template
Service providers will need to customise a new email template. Once the template is ready, enable the event.
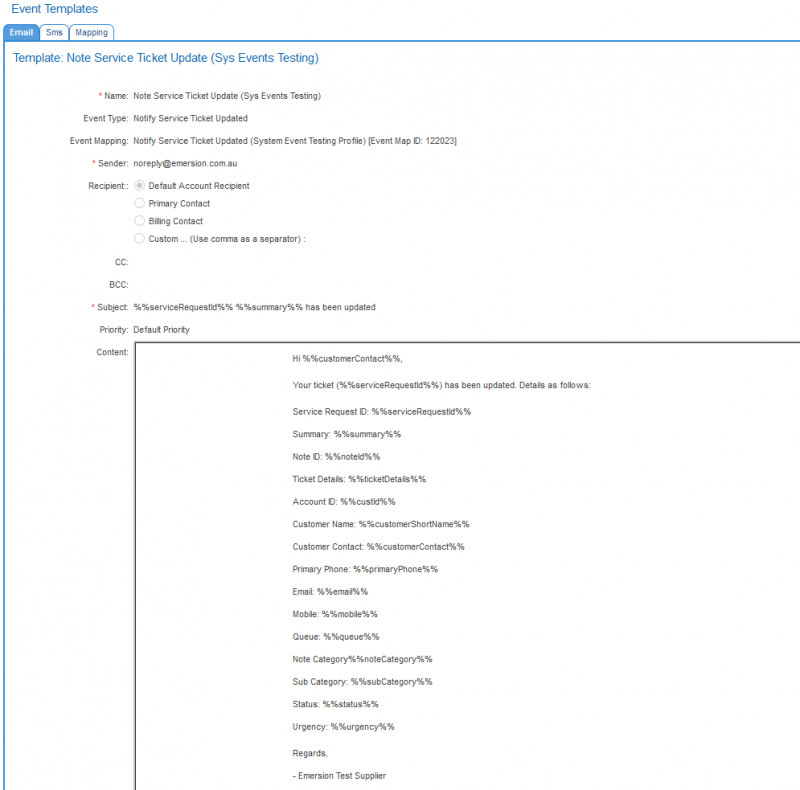
To begin creating and customising your template go to the following location(s):
- NAV: Events > Templates > Email
It is recommended to choose the Default Account Recipient.
For the subject, we suggest starting with the ticket ID event variable to populate the subject line with the ticket ID.
- For example: Ticket %%serviceRequestId%% %%summary%% has been updated.
If you are utilising ticket queue email prefixes (to enable email responses to existing tickets to automatically add notes), the subject will have [<email-prefix>|<ticket-id>] prepended to any existing text or variable output.
- For example --> SUP|12345678 Your ticket about %summary% has been updated.
Enable the Event
Before you can use the event, it must be enabled. For more comprehensive help regarding events and event templates, click the links below.
Testing the Event
Once the event is enabled with a template configured, service providers can test it using the basic process below.
Most customers will at least one test customer (end user) account to aid in activities like training and troubleshooting. Other times, Emersion create a test customer under your service provider account for the purposes of support. If you have an exiting test account, use this for the testing of the event. If we have done this, it will most likely named "Emersion Test". If you do not have a test account, create one and give it any name you like.
Then, before you create or update any tickets, first ensure that the Primary Contact's email address is set to an email address that you have access to, such as a personal email address, or an email mailbox you set up purely for testing. Either will work, as long as you can log into it and send/receive emails from it.
Once you have your mailbox and test customer ready, use the following procedure.
Test Procedure
- Create a new service desk ticket for this account.
- Save the ticket.
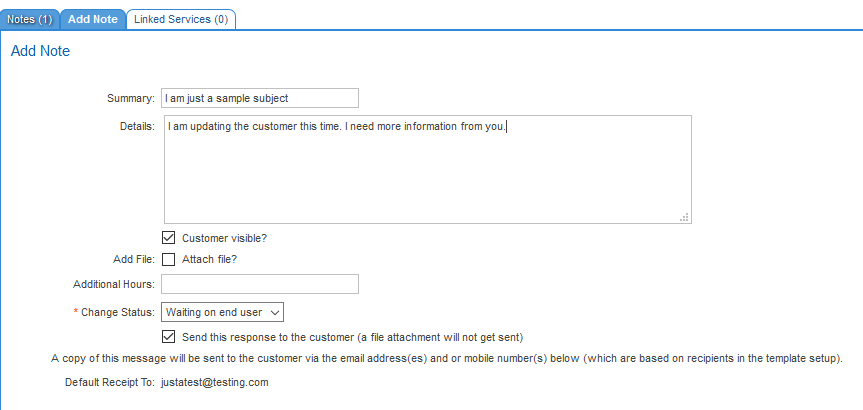
- Go back into the ticket and add a note.
- Fill out your note and change the status, as appropriate.
- Ensure you have the Customer visible? checkbox enabled.
- You will now see a new checkbox Send this response to the customer. This checkbox MUST be enabled for the event to send an email to the customer.
- Click Save
An email will be sent to the customer via our standard events system. You can monitor this via Events > Message Queue > Email Queue and filter on the account ID you are testing. The Notify Service Ticket Updated event type will appear in the results.
!! Important !! If the system is experience heavily load (such as at the start of the month when the majority of service providers are in the middle of a bill run), be aware could be several minutes before you see the email message.
If you do not see the email message within 30 minutes, review your set up carefully and re-test after making any configuration adjustments. If you need further assistance, raise a ticket with us and include the details of your test case. We will be pleased to assist.

