Difference between revisions of "Reports/Report Scheduler"
From Emersion
(Created page with "{{DISPLAYTITLE: Report Scheduler}} = Overview = The report scheduler enables service providers to have reports run automatically and have them delivered to a nominated recipie...") |
|||
| Line 1: | Line 1: | ||
{{DISPLAYTITLE: Report Scheduler}} | {{DISPLAYTITLE: Report Scheduler}} | ||
= Overview = | = Overview = | ||
| − | The report scheduler enables service providers to have reports run automatically and have them delivered to a nominated recipient at a user-defined date and time. | + | The report scheduler enables service providers to have reports run automatically and have them delivered to a nominated recipient at a user-defined date and time. Each report can be set up with its own delivery schedule independently. |
= Prerequisites = | = Prerequisites = | ||
| Line 10: | Line 10: | ||
To learn more about events, refer the help section on [[Events]]. | To learn more about events, refer the help section on [[Events]]. | ||
| + | |||
| + | = Create a Schedule = | ||
| + | To create a new schedule: | ||
| + | |||
| + | Nav: '''Reports > List''' | ||
| + | |||
| + | # Click on the tab containing the report. | ||
| + | # Find the report in the list of reports. | ||
| + | # Click the '''Generate Report''' link on the right-hand side of the report's row entry. | ||
| + | # If it is provided, use the report filters to narrow the criteria of the report. The narrower the criteria used, the less time the report will take to return the results. Mandatory filter fields are represented by an asteric next to the field name. | ||
| + | # On the page of the report, click '''Schedule Report''' as shown below. | ||
| + | |||
| + | |||
| + | [[file:Start-report-schedule.png|1200px|]] | ||
| + | |||
| + | The user will be taken to the screen to define the rules for the schedule. | ||
| + | |||
| + | [[file:Report-schedule-main.png|1200px|]] | ||
| + | |||
| + | Complete the fields in each section. | ||
| + | |||
| + | In the ''Report'' section: | ||
| + | |||
| + | # Select the Parent Account from the list. For retail service providers, there will be only a single entry. | ||
| + | # In the '''Start Date''' field, choose a date that the report schedule is to commence. | ||
| + | # Enter an optional '''End Date''' if you want the report to stop being automatically run after this date. | ||
| + | |||
| + | In the ''Schedule'' section: | ||
| + | |||
| + | In the ''Email'' section: | ||
Revision as of 17:04, 11 September 2017
Overview
The report scheduler enables service providers to have reports run automatically and have them delivered to a nominated recipient at a user-defined date and time. Each report can be set up with its own delivery schedule independently.
Prerequisites
Before this feature can be used, it requires the following two event types to be enabled.
- Report Schedule Process (event type 902) - This event type executes the report to be run as per the schedule.
- Report Schedule Process Message (event type 903) - This event type sends the email notification with the report as an attachment. This event also requires a template to be created.
To learn more about events, refer the help section on Events.
Create a Schedule
To create a new schedule:
Nav: Reports > List
- Click on the tab containing the report.
- Find the report in the list of reports.
- Click the Generate Report link on the right-hand side of the report's row entry.
- If it is provided, use the report filters to narrow the criteria of the report. The narrower the criteria used, the less time the report will take to return the results. Mandatory filter fields are represented by an asteric next to the field name.
- On the page of the report, click Schedule Report as shown below.
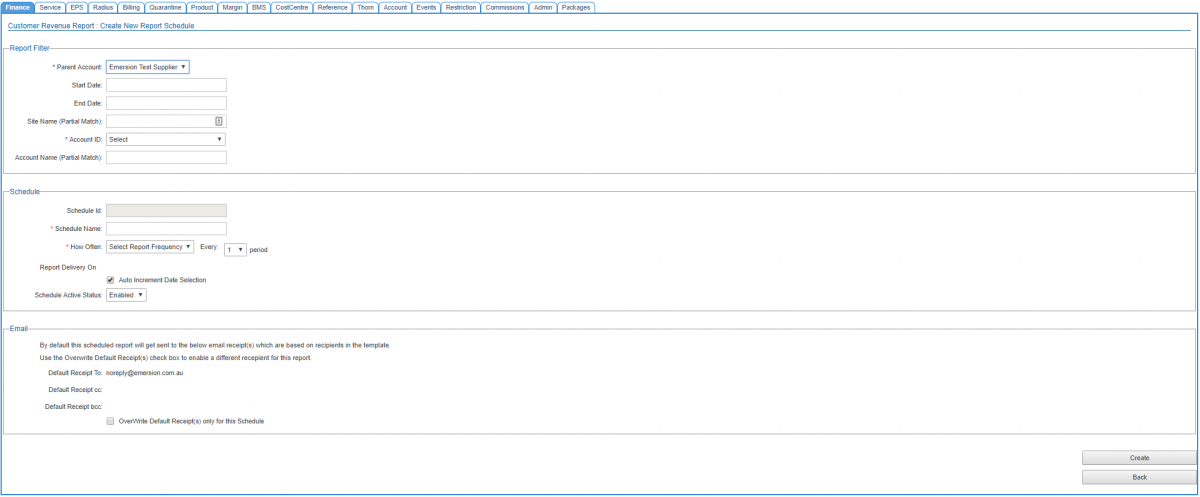
The user will be taken to the screen to define the rules for the schedule.
Complete the fields in each section.
In the Report section:
- Select the Parent Account from the list. For retail service providers, there will be only a single entry.
- In the Start Date field, choose a date that the report schedule is to commence.
- Enter an optional End Date if you want the report to stop being automatically run after this date.
In the Schedule section:
In the Email section:

