Difference between revisions of "Payment Plans V2/Create Payment Plan"
(→Off-Cycle Payments) |
(→Creating a new Payment Plan) |
||
| Line 12: | Line 12: | ||
If you are interested in subscribing to [[Payment_Plans_V2 | Payment plans V2]] or any of our additional modules, please raise a new sales ticket in the [http://support.emersion.com.au Emerson Support Portal]. | If you are interested in subscribing to [[Payment_Plans_V2 | Payment plans V2]] or any of our additional modules, please raise a new sales ticket in the [http://support.emersion.com.au Emerson Support Portal]. | ||
| − | == Creating | + | == Creating Payment Plans == |
| − | + | Follow these steps to create a payment plan for a customer. | |
| − | If you | + | === Enable Automated Payments for the Customer === |
| + | |||
| + | Before you begin, one of the pre-requisites for setting up a payment plan for a customer is that the customer must have an automated payment method enabled. If you attempt to create a payment plan for a customer without automated payments, Cumulus will display a message and redirect the user automatically to the '''Customer > Payment Method''' tab. | ||
| + | |||
| + | '''''! Important !'''' | ||
| + | Enabling the Automated Payment method will take a payment from the customer immediately if the invoice that will be covered by the payment plan is already overdue. This behaviour is design and under normal conditions is the desired outcome. However this is not likely to be the desired outcome if a payment plan is to be created covering this overdue amount. To avoid a payment being taken for an overdue amount that will be covered by a payment plan, use the "Automated Payments cannot be taken until" field as pictured below. Setting this to be a date in the future will prevent payments being taken until the date arrives. This will give you the opportunity to set up the payment plan before any automatic deductions are made. | ||
[[File:Canttakepayments until.png]] | [[File:Canttakepayments until.png]] | ||
| + | Once the customer's automated payment method is enabled you can proceed with creating a payment plan. | ||
| + | |||
| + | == Create New Payment Plan == | ||
| − | + | Nav: '''Customer > Payment Plan > Create Payment Plan''' | |
[[File:Create New.png|Create Payment Plan]] | [[File:Create New.png|Create Payment Plan]] | ||
| − | In the first step of the wizard, the system | + | === Step 1: Select Invoices === |
| + | |||
| + | In the first step of the wizard, the system requests users to select invoices and amount for each invoice to be covered to the payment plan. If you are covering a partial amount of an invoice, the remaining balance of that invoice will be treated as an overdue amount in terms of events (e.g. overdue notifications) and payments (via automatic payment method). | ||
[[File:Select Invoice.png]] | [[File:Select Invoice.png]] | ||
| − | + | Once you have selected the invoices and the amount from each invoice to be covered, press '''Enter Payment Plan''' to proceed to the next step. | |
| − | * | + | === Step 2: Enter Payment Plan Details === |
| − | * | + | |
| − | * | + | Complete the fields as follows: |
| − | * Days between retry | + | |
| − | * Maximum tries | + | * '''Start date''' - Enter the date when the first payment will be deducted. |
| + | * '''Total amount''' - This is the SUM of the amounts of all invoices covered under this payment plan. | ||
| + | * '''Payment Every''' - This is the payment frequency. Enter a number and set the duration (Days, Weeks, Months). | ||
| + | * '''Number of payments''' - Enter how many payments are to be made by the customer. The system will use this value to calculate the $value of each payment for the entire payment plan. The calculation is Total Value divided by the number of payments. | ||
| + | * '''Days between retry''' This set how many days will pass before the system attempts to collect a previously failed payment. If the number of '''Maximum Retries''' is reached, the payment plan will be automatically cancelled and the invoices related will go back to their original overdue status. | ||
| + | * '''Maximum re-tries''' This setting gives users the ability to control how many attempts to take a payment can be made before cancelling the payment plan. If the payment plan is cancelled, the invoice(s) will become owing as they were before the payment plan was created. If any amounts are overdue, the system will attempt to deduct this from the customer. | ||
| + | |||
| + | When you have entered the required fields, press '''Generate Schedule'''. | ||
| + | |||
| + | === Step 3: Configure Schedule === | ||
| + | |||
| + | This page gives you a preview of the schedule | ||
[[File:Schedule pp.png|Payment Schedule]] | [[File:Schedule pp.png|Payment Schedule]] | ||
| − | + | This page gives users the ability to adjust the amounts and on what days they will occur. The amount can be changed to any value, but if the sum of all the amounts does not match the Total Value of the payment plan, users will be unable to save the changes. | |
| + | |||
| + | Below the schedule of payments and amounts is the settings you entered in step 2. Review these for accuracy. If you need to edit any of these details, press the '''Enter Payment Plan''' button to go back to step 2. | ||
| + | |||
| + | Below these settings is the list of invoices covered by the payment plan. | ||
| + | |||
| + | Once you are happy with the schedule and all settings, press '''Finalise Payment Plan'''. | ||
[[File:Review Schedule.png]] | [[File:Review Schedule.png]] | ||
| − | + | Upon saving the Payment plan, the system will display a message. | |
[[File:Pp done.png]] | [[File:Pp done.png]] | ||
Revision as of 15:07, 30 March 2016
Contents
Create and Configure Payment Plans
This article will guide users on:
- creating a new payment plan for a customer
- Updating an existing payment plan
- Changing the timing of a scheduled payment
- Making off-cycle payments
This article is part of a suite of articles exclusively written for the optional module of Payment Plans that is offered in addition to the standard Emersion offering for an additional fee. This is not related to the payment plans functionality that is available in the standard Emersion offering.
If you are interested in subscribing to Payment plans V2 or any of our additional modules, please raise a new sales ticket in the Emerson Support Portal.
Creating Payment Plans
Follow these steps to create a payment plan for a customer.
Enable Automated Payments for the Customer
Before you begin, one of the pre-requisites for setting up a payment plan for a customer is that the customer must have an automated payment method enabled. If you attempt to create a payment plan for a customer without automated payments, Cumulus will display a message and redirect the user automatically to the Customer > Payment Method tab.
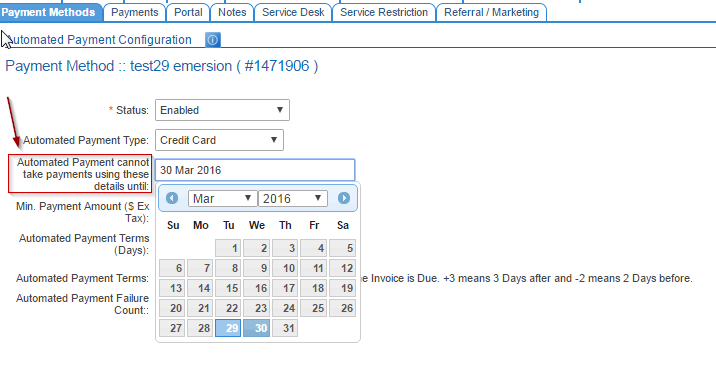
! Important !' Enabling the Automated Payment method will take a payment from the customer immediately if the invoice that will be covered by the payment plan is already overdue. This behaviour is design and under normal conditions is the desired outcome. However this is not likely to be the desired outcome if a payment plan is to be created covering this overdue amount. To avoid a payment being taken for an overdue amount that will be covered by a payment plan, use the "Automated Payments cannot be taken until" field as pictured below. Setting this to be a date in the future will prevent payments being taken until the date arrives. This will give you the opportunity to set up the payment plan before any automatic deductions are made.
Once the customer's automated payment method is enabled you can proceed with creating a payment plan.
Create New Payment Plan
Nav: Customer > Payment Plan > Create Payment Plan
Step 1: Select Invoices
In the first step of the wizard, the system requests users to select invoices and amount for each invoice to be covered to the payment plan. If you are covering a partial amount of an invoice, the remaining balance of that invoice will be treated as an overdue amount in terms of events (e.g. overdue notifications) and payments (via automatic payment method).
Once you have selected the invoices and the amount from each invoice to be covered, press Enter Payment Plan to proceed to the next step.
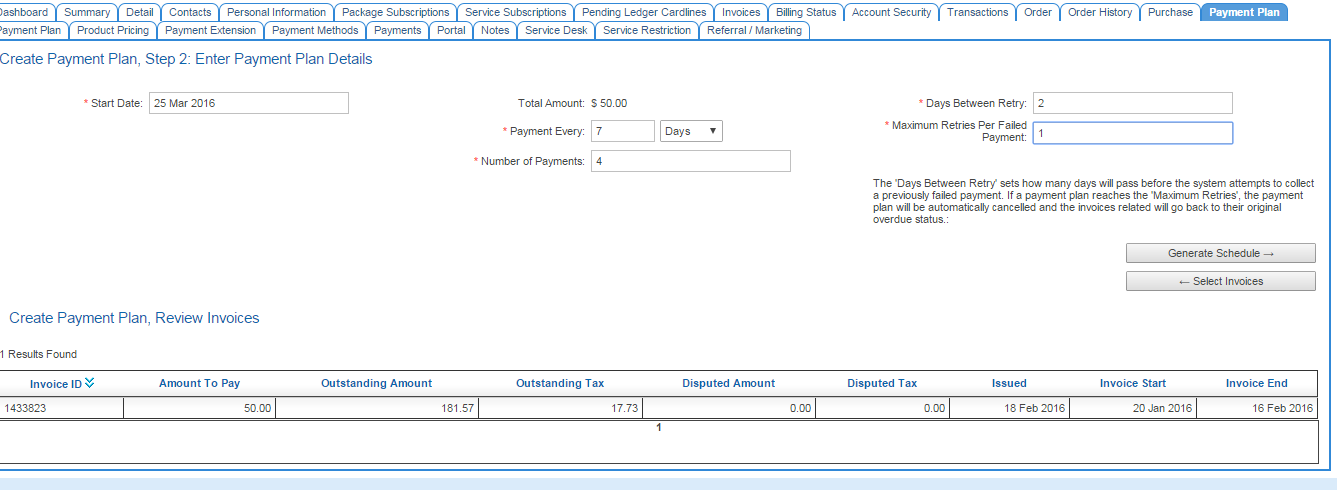
Step 2: Enter Payment Plan Details
Complete the fields as follows:
- Start date - Enter the date when the first payment will be deducted.
- Total amount - This is the SUM of the amounts of all invoices covered under this payment plan.
- Payment Every - This is the payment frequency. Enter a number and set the duration (Days, Weeks, Months).
- Number of payments - Enter how many payments are to be made by the customer. The system will use this value to calculate the $value of each payment for the entire payment plan. The calculation is Total Value divided by the number of payments.
- Days between retry This set how many days will pass before the system attempts to collect a previously failed payment. If the number of Maximum Retries is reached, the payment plan will be automatically cancelled and the invoices related will go back to their original overdue status.
- Maximum re-tries This setting gives users the ability to control how many attempts to take a payment can be made before cancelling the payment plan. If the payment plan is cancelled, the invoice(s) will become owing as they were before the payment plan was created. If any amounts are overdue, the system will attempt to deduct this from the customer.
When you have entered the required fields, press Generate Schedule.
Step 3: Configure Schedule
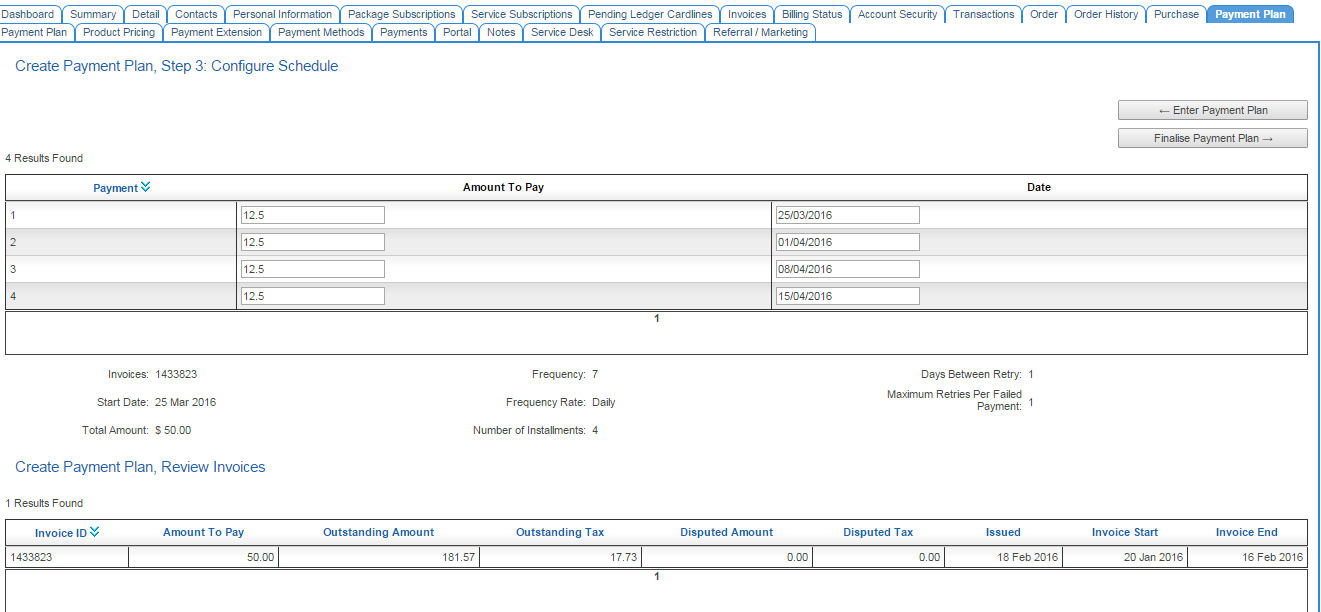
This page gives you a preview of the schedule
This page gives users the ability to adjust the amounts and on what days they will occur. The amount can be changed to any value, but if the sum of all the amounts does not match the Total Value of the payment plan, users will be unable to save the changes.
Below the schedule of payments and amounts is the settings you entered in step 2. Review these for accuracy. If you need to edit any of these details, press the Enter Payment Plan button to go back to step 2.
Below these settings is the list of invoices covered by the payment plan.
Once you are happy with the schedule and all settings, press Finalise Payment Plan.
Upon saving the Payment plan, the system will display a message.

Updating a Payment plan
It is possible to modify a payment plan (scheduled dates only), or cancel it after it has been created.
Changing scheduled payments or cancel the payment plan
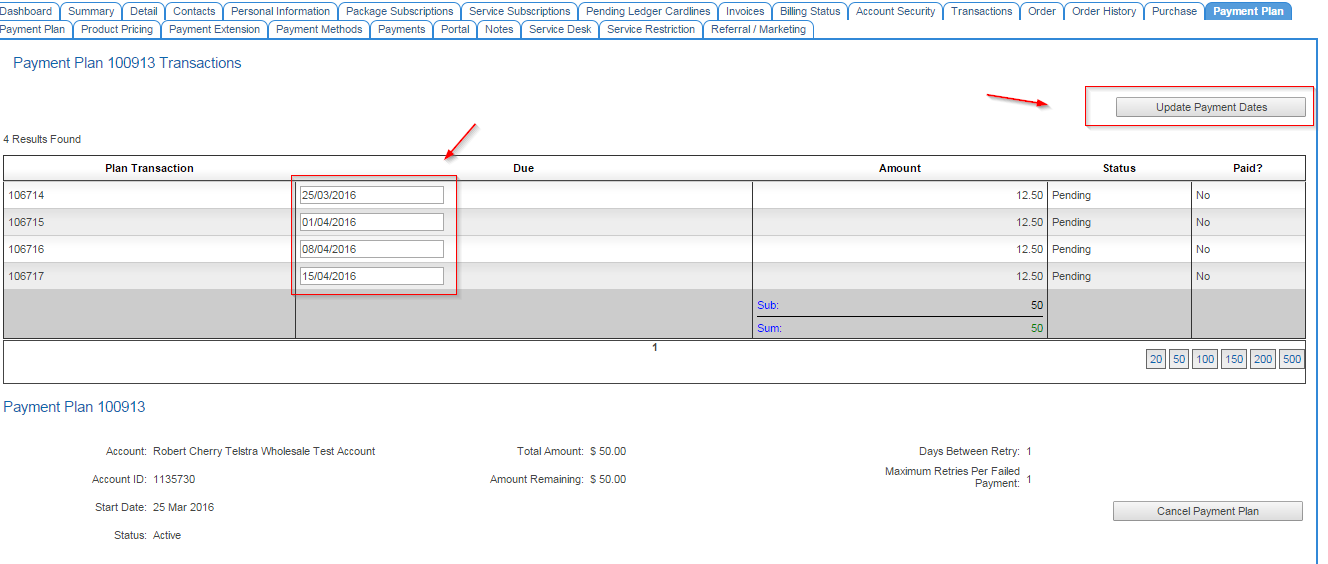
First of all navigate back to the payment plan tab and click on the ID of the payment:
From the next window you can change the scheduled payment dates here and click Update Payment Dates for this to date effect. You may also cancel the payment plan outright.
If you wish to:
- Modify the amounts of the payment plan, either the total or individual payments.
- Modify the amount of payments to be made.
- Modify other attributes such as payment retry attempts then;
You would need to cancel the payment plan outright and recreate it. Please note that cancelling the payment plan will make the amount overdue again. This could mean that the invoice will again be subject to overdue invoice events, or automatic deductions if the Automated Payment Method is still enabled.
Off-Cycle Payments / Manual Payments made by Client or Staff
There is a possibility that a payment may be processed manually by a client via the User Portal, or perhaps via a staff Member. Please be aware that such payments will not be applied to invoices subject to a payment plan. Unless there is some other outstanding amount due that is not covered by a payment plan, the payment will simply sit on the account unallocated.
If you wish to adjust the payment plan to account for this payment, at this time the only way to achieve this is to dissolve/cancel the payment plan, let the system allocate the payment to the relevant invoice (or you can manually allocated), then recreate the payment plan again.


