Difference between revisions of "Admin/My Invoice Template/Invoice Layout"
(→Special Information about Charges Summary) |
|||
| Line 48: | Line 48: | ||
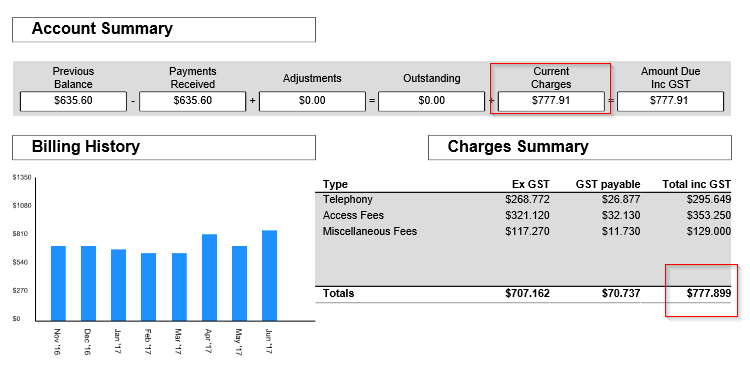
On the standard Invoice Template, the figures between the current charges total, and the totals in the charges summary figure will not always tally, are not designed to tally precisely. The reasons why are as follows. | On the standard Invoice Template, the figures between the current charges total, and the totals in the charges summary figure will not always tally, are not designed to tally precisely. The reasons why are as follows. | ||
| − | [[File:Charges summary.png | + | [[File:Charges summary.png]] |
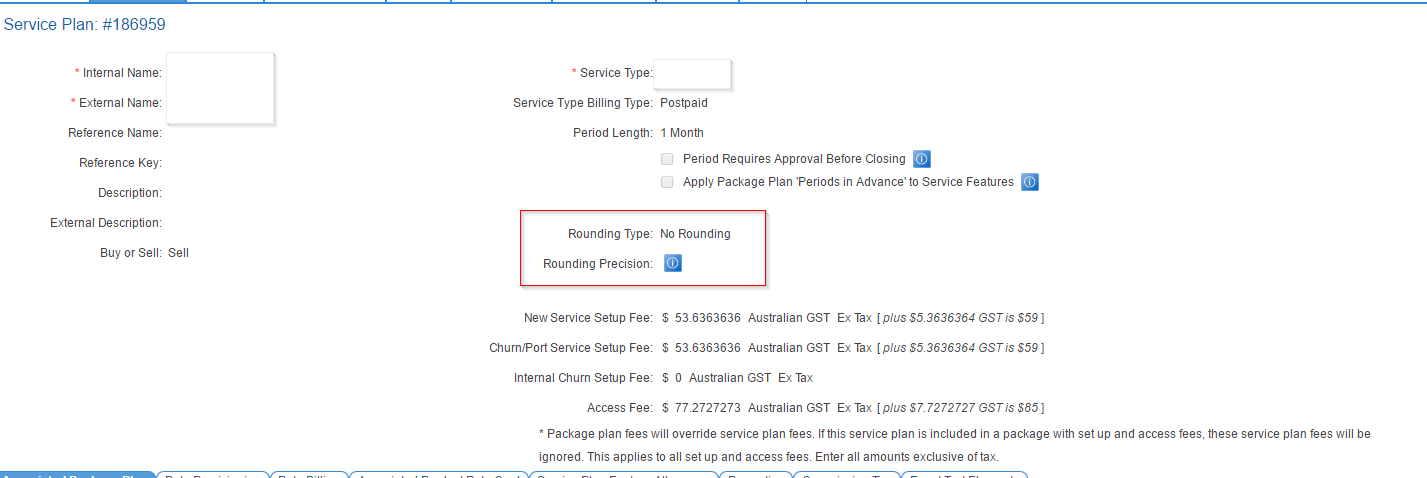
When usage is rated, it can be rated up to seven decimal places as per your service plan setting via Rounding Type and Rounding Precision. | When usage is rated, it can be rated up to seven decimal places as per your service plan setting via Rounding Type and Rounding Precision. | ||
| Line 62: | Line 62: | ||
This is why the sum of values in Charges Summary, which looks at raw underlying charges, unrounded, can be different to what is eventually the rounded figures for billing. | This is why the sum of values in Charges Summary, which looks at raw underlying charges, unrounded, can be different to what is eventually the rounded figures for billing. | ||
| − | |||
== Logos and Colours == | == Logos and Colours == | ||
Revision as of 16:49, 9 June 2017
Contents
Overview
Invoice layouts give service providers the ability to customise the following aspects of invoice template:
- The design layout that will be used
- Logos and colours
- Header logo
- Payslip logo
- General colour scheme
- Addresses
- Physical
- Pay To
- Return
- Organisation details
- Bank account details
- Cost centre settings
- AusPost BillPay settings
- Call itemisation settings
- Custom message (Image or text)
Ultimately it is the invoice layout that is mapped to the end-user customer to determine what the invoice will look like and what information will be displayed on it. For further information on how these elements interact, go to the My Invoice Template article.
Setting the Default Invoice Layout
The default invoice template layout is set for each customer account that is created. This can be overridden either when the customer is created, or later on under the Customer > Details section. Once an end user has a default invoice template layout set, a PDF invoice can be generated for the customer.
To set the default invoice layout
Nav: Admin > My Invoice Template > Invoice Layouts
- The Invoice Layout Info List screen will be displayed.
- Check the radio button of the layout that is to be the default for all customers.
A confirmation message will appear advising the user that the default invoice template has been set.
Create a New Invoice Layout
To create a new invoice layout:
- Click the Create New button. The New Invoice Layout page will appear.
- Give the new invoice layout a name and description.
- When you are finished, click the Save Layout button.
Once the new layout is saved, the user will be taken to the Logos and Colours sub tab of the new invoice layout.
!! IMPORTANT !! If you have previously customised an invoice layout with header and payslip logos, they will be available to this invoice layout in other sections (such as custom message). While they are available to choose from, they are not used used in a layout until they are explicitly selected. Deleting an image from an invoice layout will remove it from ALL layouts.
Special Information about Charges Summary
On the standard Invoice Template, the figures between the current charges total, and the totals in the charges summary figure will not always tally, are not designed to tally precisely. The reasons why are as follows.
When usage is rated, it can be rated up to seven decimal places as per your service plan setting via Rounding Type and Rounding Precision.
In addition, when access fees are pro-rata'd naturally as a result of division, the raw underlying charge can also be several decimal places before rounding. The charges summary box is designed to show you the value of charges before rounding is carried out. It is helpful information to demonstrate transparently how usage is being rated in particular.
So for instance: Usage can be rounded as per plan setting. Usage is rounded again when it is added up and put onto a cardline. Rounding can then again occur when all cardlines for Telephony, Misc and Access Fees are added up.
This is why the sum of values in Charges Summary, which looks at raw underlying charges, unrounded, can be different to what is eventually the rounded figures for billing.
Logos and Colours
To edit the logos and colours either create a new layout, or Nav: My Invoice Template > Invoice Layout > Logos and Colours
The page will open in view mode. Click the Edit button to put the page into Edit mode.
Customise the logos and colours as follows:
Logos
- Header Logo
This logo appears in the top left of the invoice. The page will show any logos used in other invoice layouts. If the logo you want to use for this layout is available, click the radio button under the image. If the logo is not available, click the Browse button, find and select your logo. The file name of the image will appear in the field until this page is saved.
Emersion strongly recommends logos are of print quality (no less than 250dpi, preferably 300dpi). Images designed for display on the web and images of a lower resolution will appear pixelated or 'fuzzy' if the invoice is printed.
- Header Logo Width (in millimetres)
The maximum width is 80mm.
- Header Logo Height (in millimetres)
The maximum height is 30mm.
- Payslip Logo
This logo appears near the bottom of the invoice along with the remittance advice. The page will show any logos used in other invoice layouts. If the logo you want to use for this layout is available, click the radio button under the image. If the logo is not available, click the Browse button, find and select your logo. The file name of the image will appear in the field until this page is saved.
- Payslip Logo Width (in millimetres)
The maximum width is 60mm.
- Payslip Logo Height (in millimetres)
The maximum height is 15mm.
Modifying Custom Image Dimensions
Sometimes your image may be too large to fit into our pre-defined 'container' box sizes where custom images show up on invoices.
When modifying the dimensions of an uploaded image, it is sometimes nice to know how to maintain the "aspect ratio" of the image - otherwise the image may look 'warped' or 'skewed' if you get your image dimensions incorrect.
A formula is provided below to assist you with coming up with correct aspect image sizes:
- Aspect ratio formula
(original height / original width) x new width = new height
- Example
(1200 / 1600) x 400 = 300
Use the above formula for an original image that is 1200H x 1600W and you wish to have the image 400W
Colour Scheme
Colours can be entered by using the standard colour name or the HEX (hexadecimal) colour code.
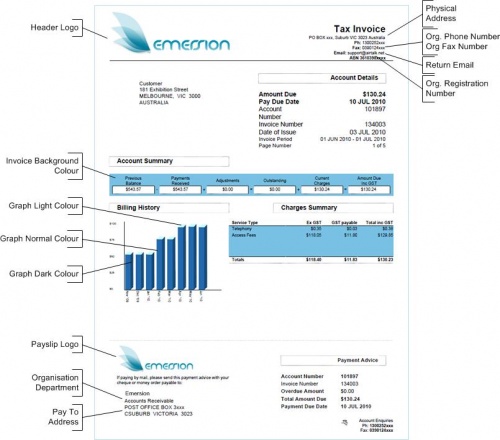
There are 4 colours that can be defined. Refer to the diagrams on the right to see which colour fields affect various areas of the standard Emersion invoice template.
- Graph Light Colour
- Enter the Graph Normal Colour.
- Enter the Graph Dark Colour.
- Enter the Invoice BG Colour for the invoice background.
When you have completed your customisation of the logos & colours, click the Save Logos and Colours Info button. The Invoice Layout Summary page will appear with an information box showing the invoice colours and logo have been saved.
Addresses
Up to three addresses can be added to your invoice. If no address is entered, nothing will display in that area of the invoice.
- Physical address
- Pay To address
- Return address
Click the Create link under the Actions column to enter an address.
If an address is already being stored in the system, the link under the actions column will be an Edit link.
Do not use the unstructured address format when completing these addresses. Use the Standard or Complex address formats only.
Organisation Details
The service provider should complete as much detail as possible in the Organisation section.
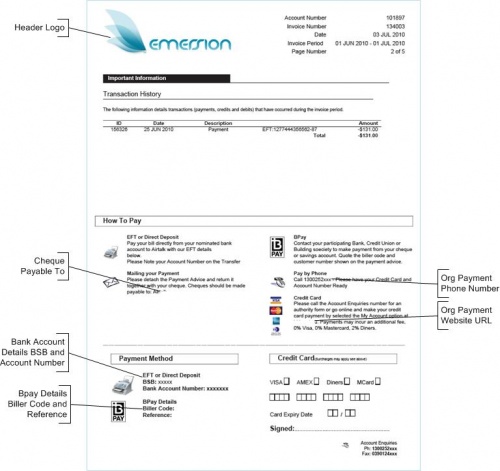
- Cheque Payable To Name
If one of the service providers options is to allow a payment by cheque, enter the cheque payable name.
> If this is left empty, no mailing of payment information will be displayed on the invoice.
- Organisation Department
Select the department responsible for accounts receivable from the drop list. This contains the organisational units that are set up.
- Return Address Department
Select the department responsible for correspondence from the drop down list that is to be displayed on the invoice.
- Org Registration Number
Select your company ABN/ACN from the drop list. This list will contain the company registration numbers entered against your service provider account.
> MANDATORY! If this is left empty, your invoices will fail to render.
- Org Phone Number
Enter your company’s main contact phone number that is to be displayed on the invoice.
- Org Payment Phone Number
Enter your company’s accounts receivable phone number that is to be displayed on the invoice.
> Entering data into this field will also enable the Pay By Phone section of the invoice to be displayed. To remove the section, remove all data from the field.
- Return Phone Number
Enter your company’s return phone number that is to be displayed on the invoice.
- Org Fax Number
Enter your company’s fax number that is to be displayed on the invoice.
- Return Email
Enter your company’s primary email address that is to be displayed on the invoice.
- Return Fax Number
Enter your company’s return fax number that is to be displayed on the invoice.
- Org Payment Website URL (Credit Card section)
Enter your company’s payment web site that is to be displayed on the invoice. Entering data into this field is one of the criteria that allows the the Credit Card section of the invoice to be displayed. In addition, global credit card surcharges need to be configured for the service provider. See this article to learn how these are set.
When you have entered in all the information, and are happy with the changed, click the Save Organisational Details button to save the changes.
Bank Account Details
On this tab, complete the fields to add information required to pay by direct bank transfer.
Click the Edit button to put the screen into edit mode. Once the page is in edit mode, all fields are mandatory and the page cannot be saved without completing the form. If you want to move away from this page without saving, click the Cancel button. Otherwise, complete the following fields.
- Bank
Choose your banking or financial services provider from the drop down list. If your bank does not appear in the list, please contact Emersion support and we can add it for you.
- BSB
Enter the BSB number of your banking or financial services provider.
- Account Number
Enter your bank account number.
- Branch
Enter your bank’s branch name.
- Account Name
Enter your bank account name.
- Reference
Enter a reference number that your customers should enter when paying their account through electronic funds or direct bank transfer.
Once you are happy with the changes and want to save the page, click the Submit button.
Miscellaneous Settings
On this page users can configure:
- Cost centre settings
- AusPost BillPay settings.
When you are happy with the settings, press the Save Misc Settings button.
Cost Centre
Cost centre settings require the service provider to subscribe to the cost centre module.
- Costcentre to Group Transactions by
If you have cost centres set up, the service provider's cost centres will appear in the drop down list. Select the cost centre that transactions are to be grouped by.
AusPost BillPay
AusPost BillPay settings require:
- the service provider to be an Australia Post Billpay "biller".
This is defined as an organisation or business, which has agreed with Australia Post to accept payments via Post Billpay so that their customers can pay their bills via the Billpay service.
- Emersion to process a data feed.
This is available upon request and service providers will incur a fee for Emersion to set up processing of the data.
Once the above two points are finalised, enter your Aust Post BillPay Biller Code into the field.
Call Itemisation Settings
Call itemisation settings provide the ability to define how much (or how little) of the usage should be itemised on the invoice.
Tariffs that are added to the call itemisation list will be summarised in the Package Summary section of the invoice and will not be itemised.
To add a tariff to the call itemisation list:
- Choose the Service Type Category from the list available.
- Select the tariff or tariff group from the list available.
- If another level of tariffs reside under the tariff group chosen above, you can select from this list to refine your selection further.
When you are happy with your selection, click the Add Itemisation button.
! Important !: Invoices with greater than 6000 lines will not render in a PDF. Instead, summary invoices will be produced. We recommend that Service Providers who have customers with large invoices over this limit are advise their customers to access and download their usage data via the End User Portal.
Custom message
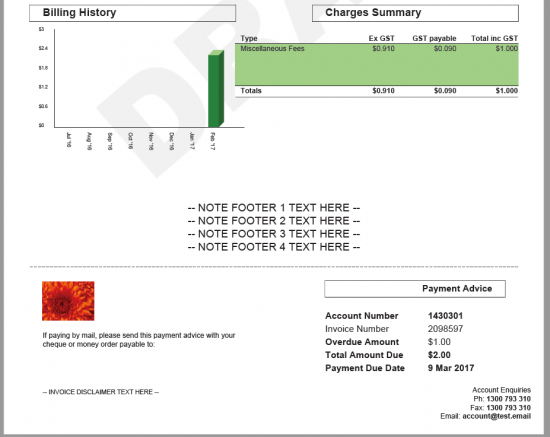
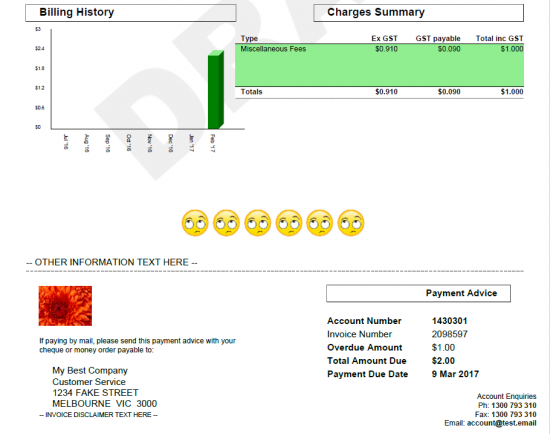
The custom message section provides a way for service providers to utilise an area on the standard Emersion invoice template that would otherwise contain white space. Service providers can add up to four footer notes, or an image here. Users can also add a disclaimer if they choose.
On the Custom Message sub tab, click the Edit button to put the page into edit mode.
- Invoice Footer
Select which format of note you want to enter (text or image). The page will refresh and display additional fields based on the user's choice.
- If Image Footer is selected, the uploaded image and/or the Other Information will display instead of the Note Footer notes.
- If Note Footer is selected, the the Note Footer notes will display instead of the uploaded image and/or the Other Information.
If Note Footer is selected:
- enter up to four footer notes
- enter an optional Invoice Disclaimer
If Image Footer is selected:
- If there are images thumbnails displayed, the user can select one of these images by choosing the radio button beneath the image. Otherwise they can browse for a new image to upload.
- enter the Image Footer Width in mm.
- enter the Image Footer Height in mm.
- (be careful of your image dimensions - see here)
- enter an optional text-based message in the Other Information field.
- enter an optional Invoice Disclaimer
It is recommended to not have an image any wider than approx 200mm (given an A4 page is 210mm max wide) to prevent it over-hanging the margins of the A4 page.
Also, if an image is higher than approx 20mm, any Other Information text entered will drop down to Page 2.
When you are happy with the settings on this page, click the Submit button.
