Difference between revisions of "Admin/My Invoice Template/Invoice Layout"
(→Create a New Invoice Layout) |
(→Invoice Layout Customisation) |
||
| Line 43: | Line 43: | ||
'''!! IMPORTANT !!''' If you have previously customised an invoice layouts with header and payslip logos, they will be available to this new invoice layout. While they are available to choose from, they are not used used in a layout until they are explicitly selected. Deleting an image from an invoice layout will remove it from ALL layouts. | '''!! IMPORTANT !!''' If you have previously customised an invoice layouts with header and payslip logos, they will be available to this new invoice layout. While they are available to choose from, they are not used used in a layout until they are explicitly selected. Deleting an image from an invoice layout will remove it from ALL layouts. | ||
| − | == | + | == Logos and Colours == |
[[File:InvoiceLayout1.jpg|500px|thumb|The ''Invoice Layout Cover page'' list page]] [[File:InvoiceLayout2.jpg|500px|thumb|The ''Invoice Layout second page'' list page]] | [[File:InvoiceLayout1.jpg|500px|thumb|The ''Invoice Layout Cover page'' list page]] [[File:InvoiceLayout2.jpg|500px|thumb|The ''Invoice Layout second page'' list page]] | ||
| + | |||
| + | To edit the colour scheme or the logos used for the invoice layout, either create a new layout, or '''Nav: My Invoice Template > Invoice Layout > Logos and Colours''' | ||
| + | |||
| + | # Click the '''Logos & Colour''' tab. The ''Logos and Colour information'' page will be displayed. | ||
| + | # Click the '''Edit''' button. The page will update to show the fields enabled for editing. | ||
| + | # Select the ''Header Logo'' file (e.g. .jpg, .png etc). Click the '''Browse''' button beside the field. The ''File Upload'' window will appear. Navigate to and select the required logo graphic file, and then click '''Open'''. The file name will appear in the field. | ||
| + | # Enter the ''Header Logo Width'' (in millimetres). The maximum width is 80 mm. | ||
| + | # Enter the ''Header Logo Height'' (in millimetres). The maximum height is 30 mm. | ||
| + | # Select the ''Payslip Logo'' file that appears near the bottom of the invoice along with the remittance advice. Click the '''Browse''' button beside the field. The ''File Upload'' window will appear. Navigate to and select the required logo graphic file, and then click '''Open'''. The file name will appear in the field. | ||
| + | # Enter the ''Payslip Logo Width'' (in millimetres). The maximum width is 60 mm. | ||
| + | # Enter the ''Payslip Logo Height'' (in millimetres). The maximum height is 15 mm. | ||
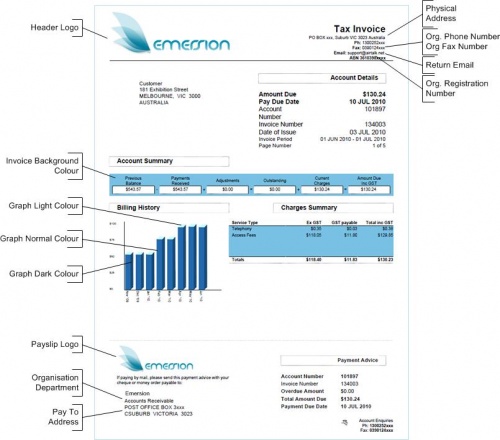
| + | # Enter the ''Graph Light Colour'' (see diagram above). <br/> Note: The colours for the usage graph bars and invoice background must be entered using the standard colour name or hex colour code (refer to [http://www.w3.org/TR/css3-color/ http://www.w3.org/TR/css3-color/#svg-color]). | ||
| + | # Enter the ''Graph Normal Colour''. | ||
| + | # Enter the ''Graph Dark Colour''. | ||
| + | # Enter the ''Invoice BG Colour'' for the invoice background. | ||
| + | # Click the '''Save Logos and Colours Info''' button. The ''Invoice Layout Summary'' page will appear with an information box showing the invoice colours and logo have been saved. | ||
Revision as of 18:26, 26 July 2016
Contents
Overview
Invoice layouts give service providers the ability to customise the following aspects of invoice template:
- Which design the layout will use
- Logos and colours
- Header logo
- Payslip logo
- General colour scheme
- Addresses
- Physical
- Pay To
- Return
- Organisation details
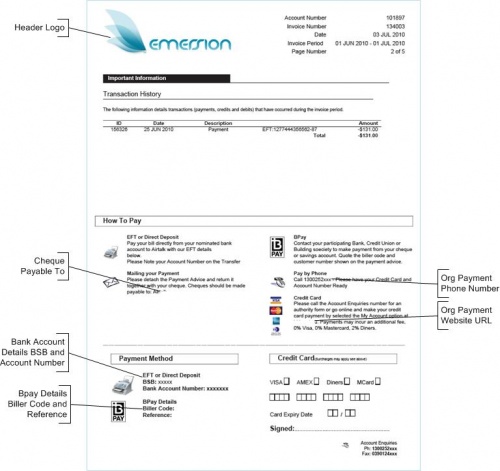
- Bank account details
- Cost centre settings
- AusPost BillPay settings
- Call itemisation settings
- Custom message (Image or text)
Ultimately it is the invoice layout that is mapped to the end-user customer to determine what the invoice will look like and what information will be displayed on it. For further information on how these elements interact, go to the My Invoice Template article.
Setting the Default Invoice Layout
The default invoice template layout is set for each customer account that is created. This can be overridden either when the customer is created, or later on under the Customer > Details section. Once an end user has a default invoice template layout set, a PDF invoice can be generated for them.
To set the default invoice layout
Nav: Admin > My Invoice Template > Invoice Layouts
- The Invoice Layout Info List screen will be displayed.
- Check the radio button of the layout that is to be the default for all customers.
A confirmation message will appear advising the user that the default invoice template has been set.
Create a New Invoice Layout
To create a new invoice layout:
- Click the Create New button. The New Invoice Layout page will appear.
- Give the new invoice layout a name and description.
- When you are finished, click the Save Layout button.
Once the new layout is saved, the user will be taken to the Logos and Colours sub tab of the new invoice layout.
!! IMPORTANT !! If you have previously customised an invoice layouts with header and payslip logos, they will be available to this new invoice layout. While they are available to choose from, they are not used used in a layout until they are explicitly selected. Deleting an image from an invoice layout will remove it from ALL layouts.
Logos and Colours
To edit the colour scheme or the logos used for the invoice layout, either create a new layout, or Nav: My Invoice Template > Invoice Layout > Logos and Colours
- Click the Logos & Colour tab. The Logos and Colour information page will be displayed.
- Click the Edit button. The page will update to show the fields enabled for editing.
- Select the Header Logo file (e.g. .jpg, .png etc). Click the Browse button beside the field. The File Upload window will appear. Navigate to and select the required logo graphic file, and then click Open. The file name will appear in the field.
- Enter the Header Logo Width (in millimetres). The maximum width is 80 mm.
- Enter the Header Logo Height (in millimetres). The maximum height is 30 mm.
- Select the Payslip Logo file that appears near the bottom of the invoice along with the remittance advice. Click the Browse button beside the field. The File Upload window will appear. Navigate to and select the required logo graphic file, and then click Open. The file name will appear in the field.
- Enter the Payslip Logo Width (in millimetres). The maximum width is 60 mm.
- Enter the Payslip Logo Height (in millimetres). The maximum height is 15 mm.
- Enter the Graph Light Colour (see diagram above).
Note: The colours for the usage graph bars and invoice background must be entered using the standard colour name or hex colour code (refer to http://www.w3.org/TR/css3-color/#svg-color). - Enter the Graph Normal Colour.
- Enter the Graph Dark Colour.
- Enter the Invoice BG Colour for the invoice background.
- Click the Save Logos and Colours Info button. The Invoice Layout Summary page will appear with an information box showing the invoice colours and logo have been saved.

