Difference between revisions of "Admin/My Invoice Template/Invoice Layout"
(Created page with "= Overview = Invoice layouts give service providers the ability to customise the following aspects of invoice template: * Which design the layout will use * Logos and colours...") |
|||
| Line 18: | Line 18: | ||
* Custom message (Image or text) | * Custom message (Image or text) | ||
| − | Ultimately it is the ''invoice layout'' that is mapped to the end-user customer to determine what the invoice will look like. | + | Ultimately it is the ''invoice layout'' that is mapped to the end-user customer to determine what the invoice will look like and what information will be displayed on it. For further information on how these elements interact, go to the [[Admin/My Invoice Template|My Invoice Template article]]. |
| + | |||
| + | == Setting the Default Invoice Layout == | ||
| + | The default invoice template layout is set for each customer account that is created. This can be overridden either when the customer is created, or later on under the [[Account_Management/Customer_Screen/Details|'''Customer > Details''' section]]. Once an end user has a default invoice template layout set, a PDF invoice can be generated for them. | ||
| + | |||
| + | To set the default invoice layout | ||
| + | |||
| + | '''Nav: Admin > My Invoice Template > Invoice Layouts''' | ||
| + | |||
| + | # The ''Invoice Layout Info List'' screen will be displayed. | ||
| + | # Check the radio button of the layout that is to be the default for all customers. | ||
| + | |||
| + | A confirmation message will appear advising the user that the default invoice template has been set. | ||
| + | |||
| + | == Create a New Invoice Layout == | ||
| + | |||
| + | To create a new invoice layout: | ||
| + | # Click the '''Create New '''button. The ''New Invoice Layout'' page will appear. | ||
| + | # Give the new invoice layout a name and description. | ||
| + | # Click the '''Save Layout''' button. | ||
| + | |||
| + | Once the new layout is saved, the user will be taken to the ''Summary'' tab of the invoice layout. | ||
| + | |||
| + | # The ''Layout Information''page will reappear showing the new layout name created with an information box showing the invoice layout has been saved. | ||
| + | # Click the new invoice template name in the ''Name'' column. The ''Invoice Layout'' page will be displayed, showing the ''Summary'' page. | ||
| + | |||
| + | == Invoice Layout Customisation == | ||
| + | [[File:InvoiceLayout1.jpg|500px|thumb|The ''Invoice Layout Cover page'' list page]] [[File:InvoiceLayout2.jpg|500px|thumb|The ''Invoice Layout second page'' list page]] | ||
Revision as of 18:18, 26 July 2016
Contents
Overview
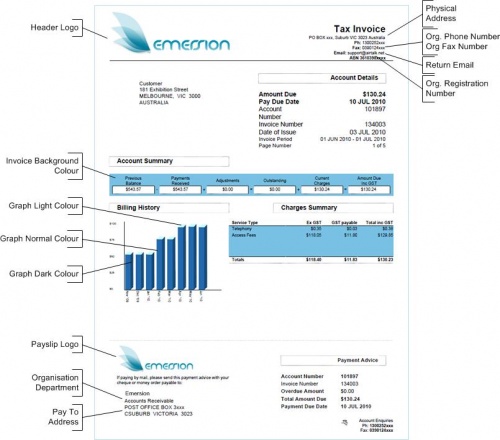
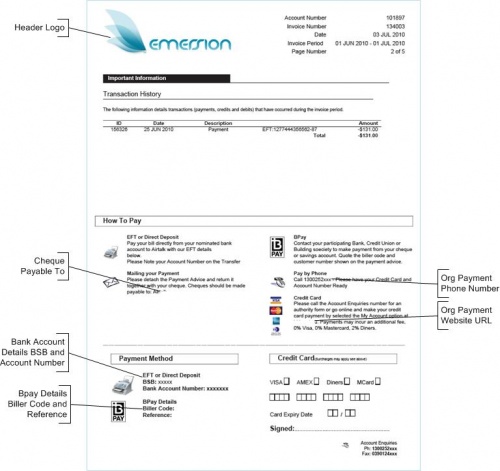
Invoice layouts give service providers the ability to customise the following aspects of invoice template:
- Which design the layout will use
- Logos and colours
- Header logo
- Payslip logo
- General colour scheme
- Addresses
- Physical
- Pay To
- Return
- Organisation details
- Bank account details
- Cost centre settings
- AusPost BillPay settings
- Call itemisation settings
- Custom message (Image or text)
Ultimately it is the invoice layout that is mapped to the end-user customer to determine what the invoice will look like and what information will be displayed on it. For further information on how these elements interact, go to the My Invoice Template article.
Setting the Default Invoice Layout
The default invoice template layout is set for each customer account that is created. This can be overridden either when the customer is created, or later on under the Customer > Details section. Once an end user has a default invoice template layout set, a PDF invoice can be generated for them.
To set the default invoice layout
Nav: Admin > My Invoice Template > Invoice Layouts
- The Invoice Layout Info List screen will be displayed.
- Check the radio button of the layout that is to be the default for all customers.
A confirmation message will appear advising the user that the default invoice template has been set.
Create a New Invoice Layout
To create a new invoice layout:
- Click the Create New button. The New Invoice Layout page will appear.
- Give the new invoice layout a name and description.
- Click the Save Layout button.
Once the new layout is saved, the user will be taken to the Summary tab of the invoice layout.
- The Layout Informationpage will reappear showing the new layout name created with an information box showing the invoice layout has been saved.
- Click the new invoice template name in the Name column. The Invoice Layout page will be displayed, showing the Summary page.

