Difference between revisions of "Products/Serialised Products/Selling"
(→Selling to a Retail Service Provider) |
|||
| Line 21: | Line 21: | ||
= Selling to a Retail Service Provider = | = Selling to a Retail Service Provider = | ||
| − | The process of selling product instances | + | The process of selling product instances to a retail service provider (RSP), or a downstream service provider is almost identical to selling to an End User. |
| − | + | '''Nav: Customer > List ''' | |
| − | Using the | + | Using the customer search, find your service provider customer. |
| − | Click the '''Create Purchase''' icon in the right-hand column. Alternatively | + | Click the '''Create Purchase''' icon in the right-hand column. Alternatively, you can start this process from the '''Customer > Purchase''' tab. |
| − | [[File:Create_purchase.png]] | + | [[File:Create_purchase.png|1200px|Create Purchase Link]] |
| − | + | When the outright purchase screen appears, search for and select the product. Users can enter the Emersion Product ID or other ID types, or they can filter using the [[Products/Categories|categories and subcategories]] to locate the product. In this example, we have found a nano SIM. | |
| − | Complete all fields as required. The quantity you nominate will be allocated from the inventory automatically. | + | Complete all fields as required. The quantity you nominate will be allocated from the inventory automatically. Changing the quantity will reload the unit and total prices of the product. |
| − | + | '''' !! IMPORTANT: If the Quantity is 1, a serial number field will appear. With serialised products that will be selected from the inventory, leave this field empty. We will choose the product instances in a moment.'''' | |
| − | [[ | + | [[file: serialised-product-purchase-addcart.png|1200px| Products selected to be added to the cart]] |
| − | + | Once you are happy with the purchase information for that product, click the '''Add to Cart''' button. A message on the screen will confirm the product has been added to the cart. At this point you can add more products to the cart until you've added all the product into the purchase order for the customer. | |
| − | + | Once you are happy all the products have been added to the cart, you can proceed to pick from the inventory to allocate product instances, in this case there are 20 SIMs and 5 modems). | |
| − | + | The ''Cart Details'' section shows a list of all items in the cart. | |
| − | + | Click the Serial Numbers hyperlink in the ''Actions'' column for the Nano SIM product. | |
| − | + | [[File:Product-purchase-serial-link.png|Purchase Serial Select]] | |
| − | [[ | + | A pop-up box will appear where users can choose the individual product instances that will be shipped to the customer. Users can also filter on warehouse and warehouse bin if the service provider subscribes to the optional [[Inventory_and_Warehouses | Warehouse]] module. Copy & paste the serial/SIM numbers from the list on the right-hand side of the window. |
| + | [[File: Product-purchase-assign-serials.png|1200px|Product instances from the inventory on the right can be copied to the left]] | ||
| − | + | When this is complete and your serial numbers are all filled out, press the '''Save Serial Numbers''' button. When the conformation message appears, close the pop-up window to continue. | |
| − | + | [[File: Product-purchase-assign-serials-done.png|1200px|Serial numbers that are allocated to the purchase]] | |
| − | + | The ''Service Details'' section of this screen lists all product instances that has been selected. If the product is configured to allow it to be linked to a service, users can link a specific product instance to a service using the '''Link Service''' hyperlink. | |
| + | Lastly the ''Complete Purchase'' section prompts users how to handle the billing of the purchase. The options are are as follows: | ||
| − | * | + | * Choose '''Complete Purchase via the Service Information Record''' for the charge to appear in the monthly SIR's that are generated for wholesale SPs, assuming you use this style of billing. |
| − | + | * Choose '''Complete Purchase by Creating a Cardline''' for the charge to appear as a line item on the customer's invoice. | |
| − | * | ||
| − | [[ | + | For service providers who subscribe to the optional [[Agents]] and [[Commissions]] modules can allocate the sale to an agent. |
| − | + | Once you have completed this page in full and are happy to proceed, press the '''Proceed to Confirmation''' button. | |
| − | + | Review all the purchase information. When you are ready, press '''Confirm the Purchase'''. | |
| + | |||
| + | Once the purchase is complete and confirmed, the downstream service provider, your customer, are able to use these SIMs in either a new service or in a SIM replacement scenario. | ||
| + | |||
| + | = See Also = | ||
Revision as of 11:43, 22 June 2016
Overview
This page describes the process for selling serialised products to:
- an End User, if you are a retail service provider.
- a Retail service provider, if you are a Wholesale service provider
In both tutorial examples, we are selling SIMs. However this sale process can be replicated with any serialised product. As these tutorials only cover the selling side of product instance(s), it is assumed:
- a serialised product exists
- product instances have been loaded into the product inventory of the serialised product.
- a valid price point exists in the default price book.
- we are making an outright purchase.
Selling to an End User
Watch our short video as we leverage the inventory to sell an instance of product to an End User customer.
The media player is loading...
Selling to a Retail Service Provider
The process of selling product instances to a retail service provider (RSP), or a downstream service provider is almost identical to selling to an End User.
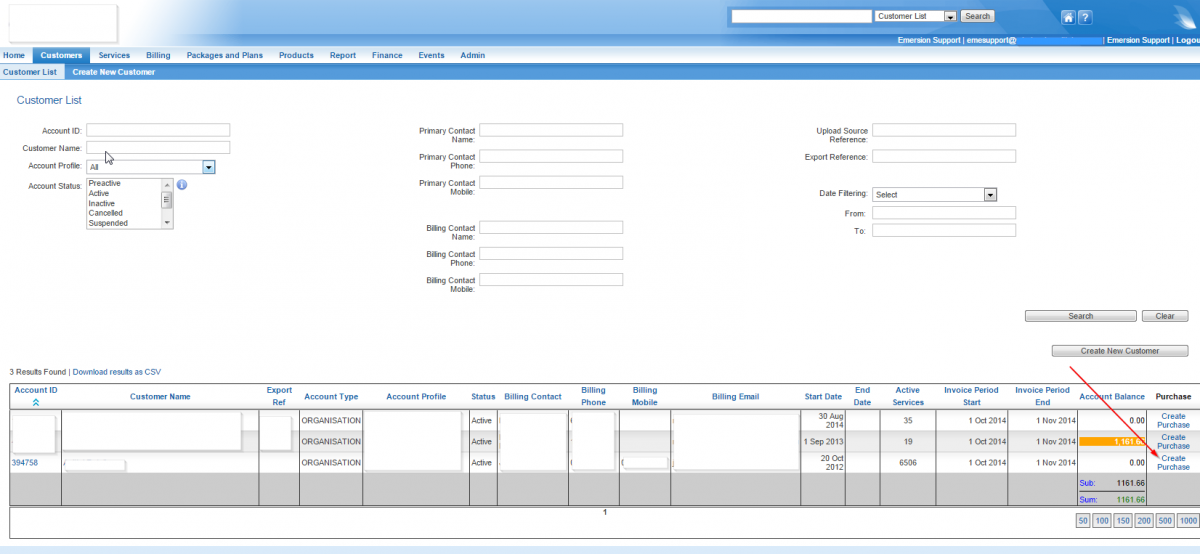
Nav: Customer > List Using the customer search, find your service provider customer. Click the Create Purchase icon in the right-hand column. Alternatively, you can start this process from the Customer > Purchase tab.
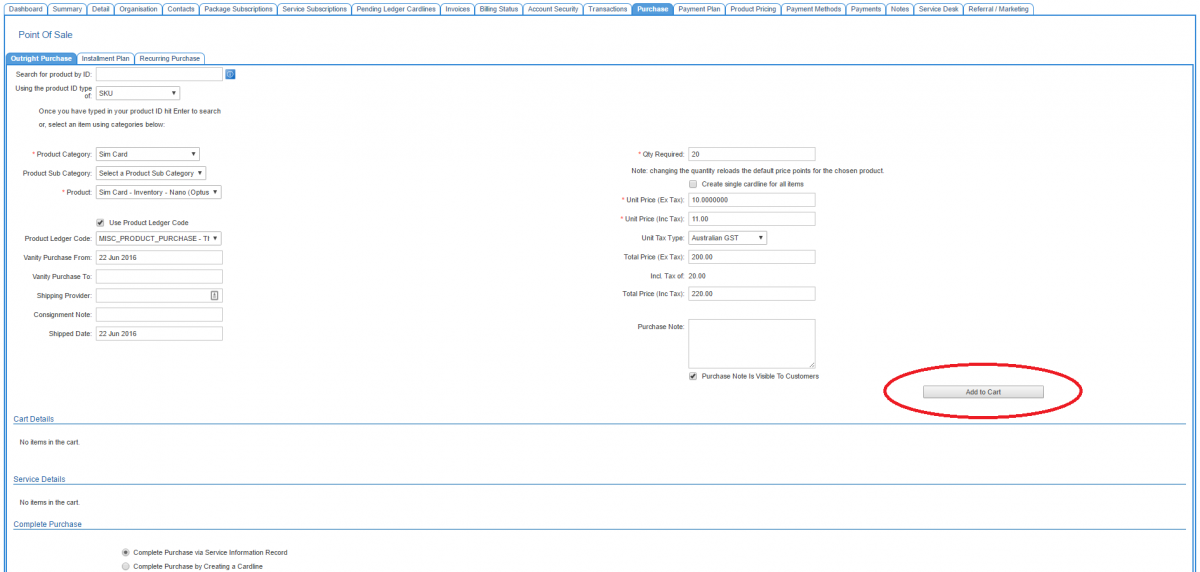
When the outright purchase screen appears, search for and select the product. Users can enter the Emersion Product ID or other ID types, or they can filter using the categories and subcategories to locate the product. In this example, we have found a nano SIM.
Complete all fields as required. The quantity you nominate will be allocated from the inventory automatically. Changing the quantity will reload the unit and total prices of the product.
' !! IMPORTANT: If the Quantity is 1, a serial number field will appear. With serialised products that will be selected from the inventory, leave this field empty. We will choose the product instances in a moment.'
Once you are happy with the purchase information for that product, click the Add to Cart button. A message on the screen will confirm the product has been added to the cart. At this point you can add more products to the cart until you've added all the product into the purchase order for the customer.
Once you are happy all the products have been added to the cart, you can proceed to pick from the inventory to allocate product instances, in this case there are 20 SIMs and 5 modems).
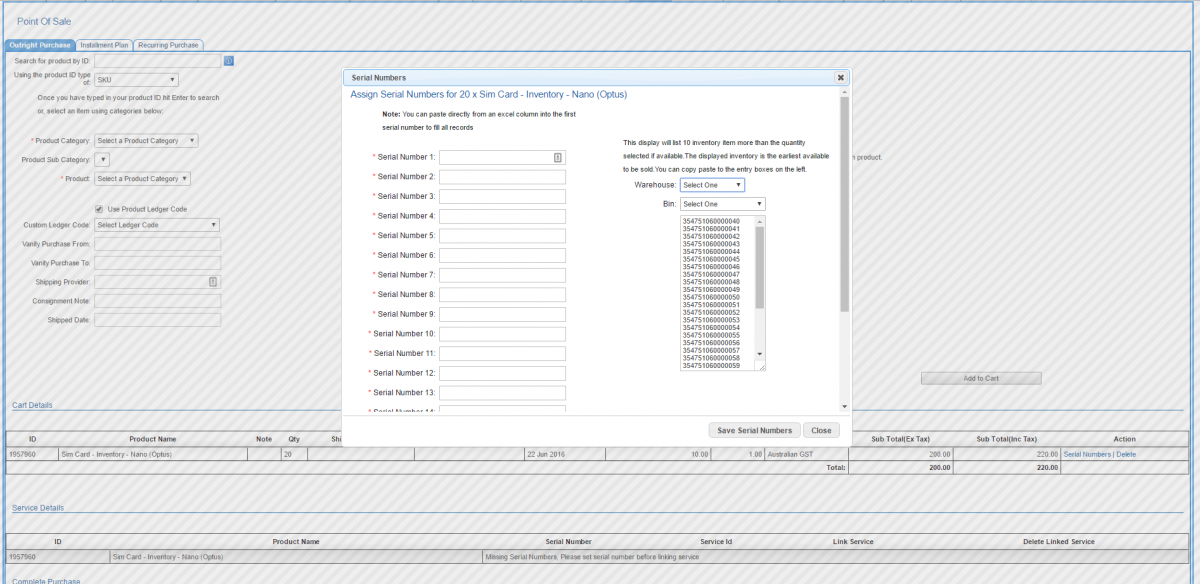
The Cart Details section shows a list of all items in the cart.
Click the Serial Numbers hyperlink in the Actions column for the Nano SIM product.
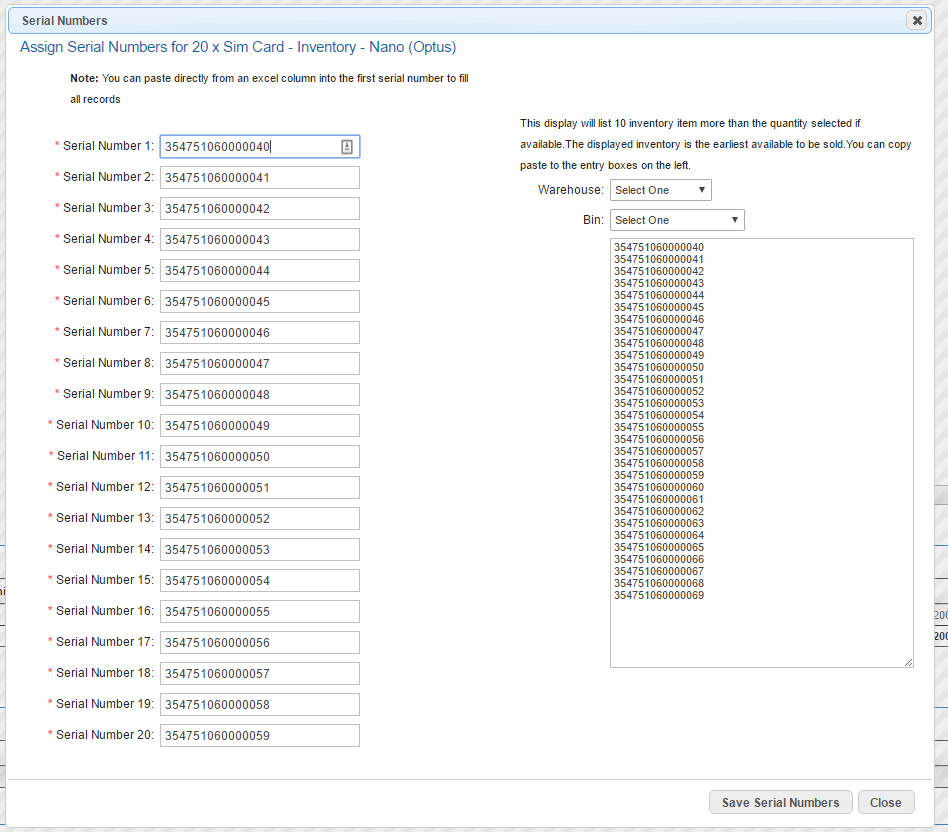
A pop-up box will appear where users can choose the individual product instances that will be shipped to the customer. Users can also filter on warehouse and warehouse bin if the service provider subscribes to the optional Warehouse module. Copy & paste the serial/SIM numbers from the list on the right-hand side of the window.
When this is complete and your serial numbers are all filled out, press the Save Serial Numbers button. When the conformation message appears, close the pop-up window to continue.
The Service Details section of this screen lists all product instances that has been selected. If the product is configured to allow it to be linked to a service, users can link a specific product instance to a service using the Link Service hyperlink.
Lastly the Complete Purchase section prompts users how to handle the billing of the purchase. The options are are as follows:
- Choose Complete Purchase via the Service Information Record for the charge to appear in the monthly SIR's that are generated for wholesale SPs, assuming you use this style of billing.
- Choose Complete Purchase by Creating a Cardline for the charge to appear as a line item on the customer's invoice.
For service providers who subscribe to the optional Agents and Commissions modules can allocate the sale to an agent.
Once you have completed this page in full and are happy to proceed, press the Proceed to Confirmation button.
Review all the purchase information. When you are ready, press Confirm the Purchase.
Once the purchase is complete and confirmed, the downstream service provider, your customer, are able to use these SIMs in either a new service or in a SIM replacement scenario.


